
Table of Contents
- Overview
- Step 1: Installation
- Step 2: Server Setup
- Step 3: Installing Nextcloud (Docker)
- Step 4: Setting Up Let’s Encrypt SSL Certificate
- Step 5: Finalizing Nextcloud Setup
- Errors and Warnings
- Useful Docker Commands
Introduction
If you are still using cloud services such as Dropbox or Google Drive for file sync, then this one is for you. Setting up a self-hosted Nextcloud server at home needn’t be difficult or complicated, and it offers complete control over your data, ensuring both privacy and security by keeping everything on your local network. We’ll also do this the right way. That means we’ll be using local disk encryption, and your Nextcloud server will ONLY be accessible at home, not over the internet. If there is a vulnerability, zero-day, or some other attack vector for Nextcloud, then I simply don’t want my home network or personal data exposed or at risk. Also, unlike using a cloud-hosted instance of Nextcloud, self-hosting allows you to maintain complete and total ownership, and privacy of your files. I’ll walk you through the entire process of setting up Nextcloud on your own server, whether that be an old PC or laptop you have lying around, or a dedicated server.
We’ll also set up full disk encryption using LUKS, ensuring that everything stored on the server is encrypted at rest. Using a custom domain name, we’ll also make use of Let’s Encrypt for our SSL certificate, providing encryption in transit. The setup will allow for local syncing when connected to your home network, such as over WiFi, with offline access to files via mobile apps like Strongbox for iPhone or KeepassDX for Android.
If you are new to terms such as RAID, then don’t worry. Just treat this as a learning exercise, and feel free to contact me if you have questions.
Overview
Disclaimer: You need to have a basic knowledge of Linux, as I won’t walk through every step of the initial setup, such as configuring a static IP address or logging in via SSH. If you’re unfamiliar with the basics of Linux, this may not be suitable for you.
Server
Before you get started, you need to decide where to install Ubuntu, which we’ll use to run our Docker image of Nextcloud. This can be a spare laptop, server, or a desktop PC you have lying around. I will say that you want this to be powered on all the time, so if you have a noisy server, leaving it running in your home office is probably going to drive you insane very quickly. I’m fortunate to have a small area in a part of the house that is well insulated and soundproofed, so noise isn’t as much of a factor. I’ve read reports of some people successfully using a Raspberry Pi with NextcloudPi, but I don’t have any experience with that.
I run VMware vSphere 8 thanks to my vExpert license, on my two Supermicro SYS-E300-9D servers, which support 10GbE networking, and are very small and compact. Obviously this is overkill for just a Nextcloud deployment, but I also use this for other virtual machines on my home network.
The choice of server may determine your storage options too, which I’ll discuss next. The reason I use VMware is so I can present an NFS (Network File System) volume from my NAS to VMware, and then create a large virtual disk for my Nextcloud data drive. The reason I do this, and not present the NFS volume directly to my Nextcloud machine, is so I can use LUKS disk encryption which only applies to block devices (HDD, SSD, iSCSI, virtual disks, etc.)
Proxmox
You don’t even need VMware vSphere to do this. A free and open-source alternative is Proxmox VE. Proxmox uses KVM for virtual machines, and LXC for containers. It’s an excellent alternative to running VMware vSphere, and allows you to run other virtual machines or containers in the future.
No matter which option you choose, I’ll assume you are using Ubuntu 22.04, rather than using Proxmox LXC or TrueNAS Scale containers. If you choose the latter, go for it.
Storage
One of the key benefits of self-hosting Nextcloud is you can use your own storage, whether that be an internal SSD or HDD, or something more significant like a NAS. I personally need a lot of storage capacity, so I use a Synology 8-Bay DiskStation DS1823xs, with six 16TB Seagate Ironwolf Pro drives. Configured in a RAID 6 storage pool, this gives me around 58TB of usable storage. However, for a long time I was using a used QNAP TS669 Pro with six 4TB drives (RAID 10).
If you don’t need a large amount of storage capacity like that, then you could even opt for a 2-bay NAS such as the Synology DS223j which costs less than $190 (US). At least with RAID 1 (disk mirroring) you’ll get some redundancy, and it’s a good introduction to using a NAS.
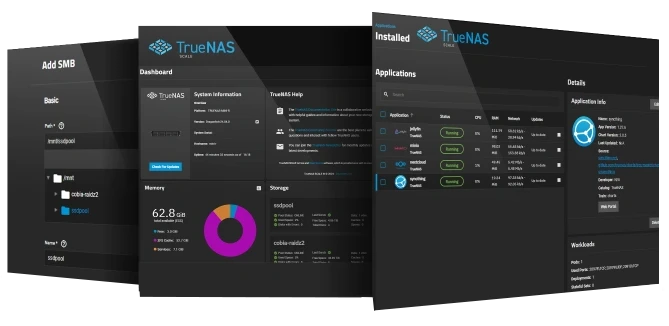
TrueNAS, as mentioned earlier, is another option, where you can repurpose an old PC or server, and build your own NAS. I tried this once, but found that having a PC case crammed full of disks was a cable management nightmare, so I decided just to pull the plug and go with the Synology NAS. However, if this is the direction you want to go in, check out TrueNAS Scale since this also allows you to run containers or virtual machines on the same platform.
1. Ubuntu Installer
By this stage, I will assume you are ready to install Ubuntu 22.04 somewhere, whether that be on a virtual machine or some other device. Here are the initial steps:
- Download and mount the Ubuntu 22.04 Server ISO
- Download the ISO from the official Ubuntu website.
- Update the the new installer
- If prompted, select ‘Update the the new installer’
- Choose Ubuntu Server (minimized)
- During the installation process, select the
Ubuntu Server (minimized)option to reduce unnecessary packages. 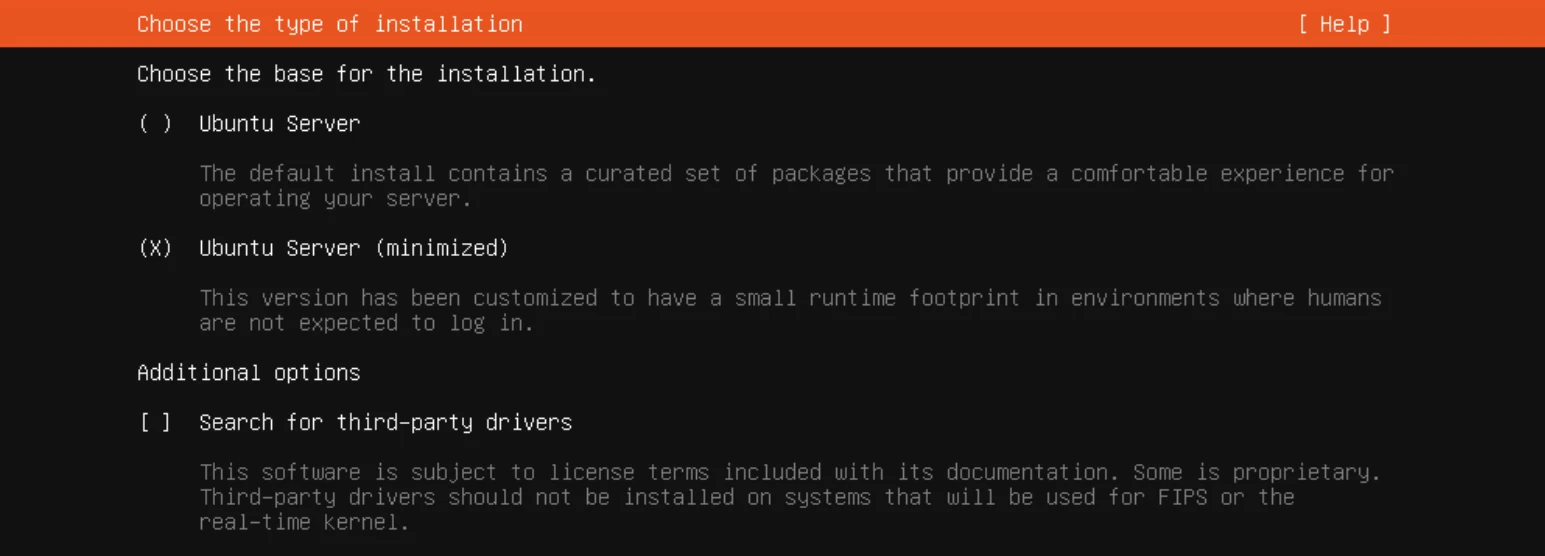
- During the installation process, select the
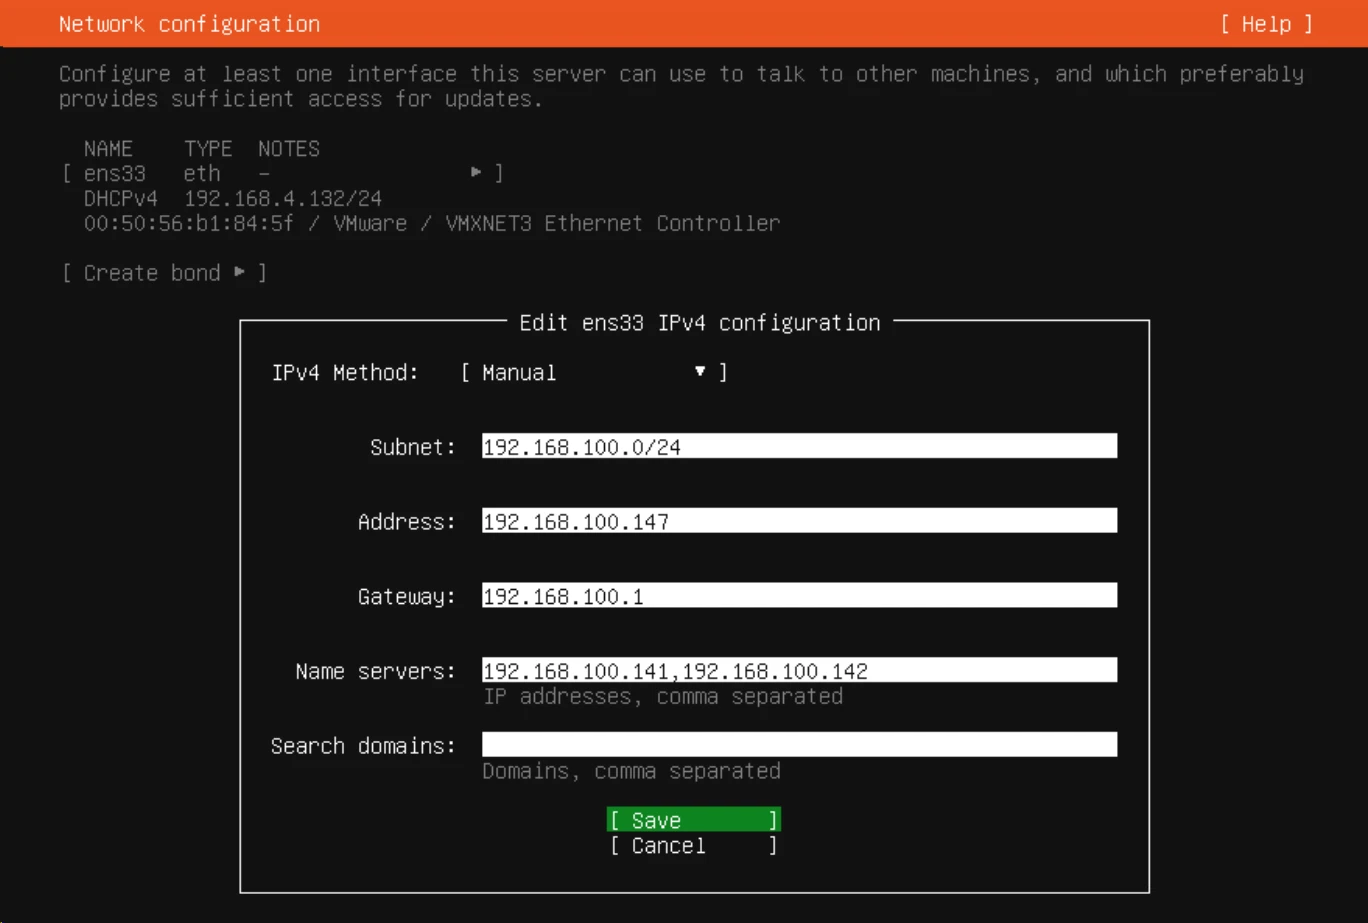
- Network Configuration
- Select the network adapter and change from DHCP to Static (Edit IPv4 > Manual)
- Set to a static IP for your network range (example below)
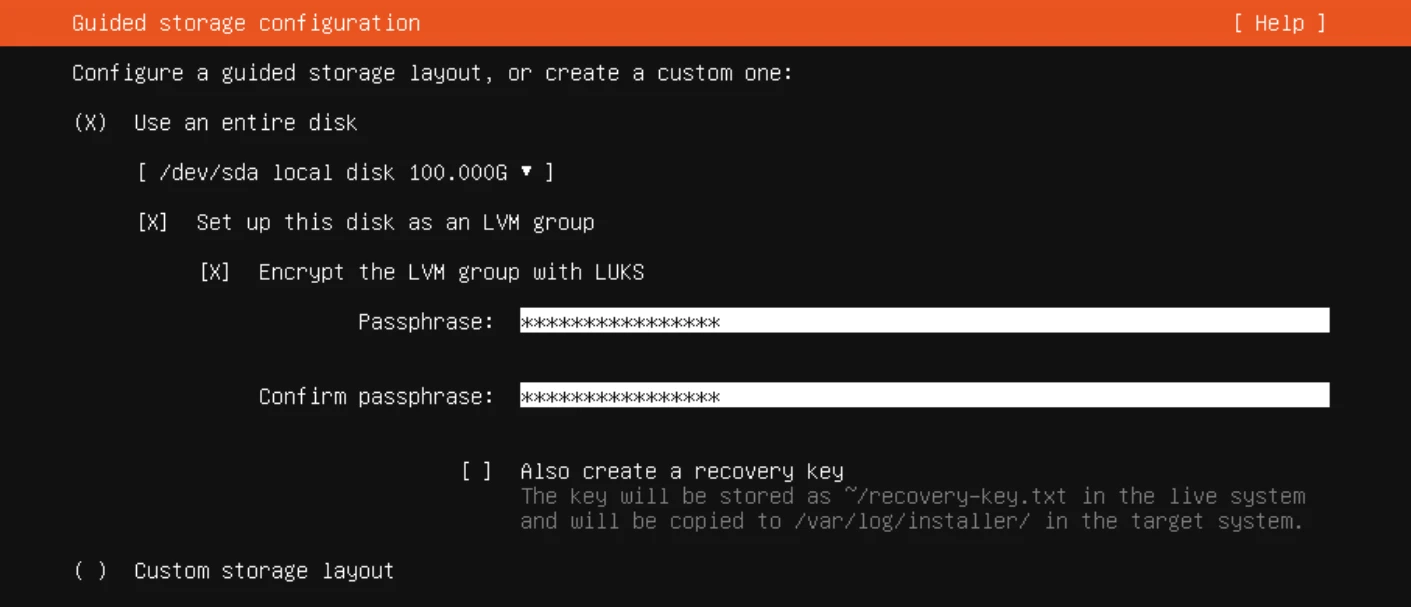
- Enable Disk Encryption (Optional)
- When you boot the machine, you’ll need to enter this passphrase.
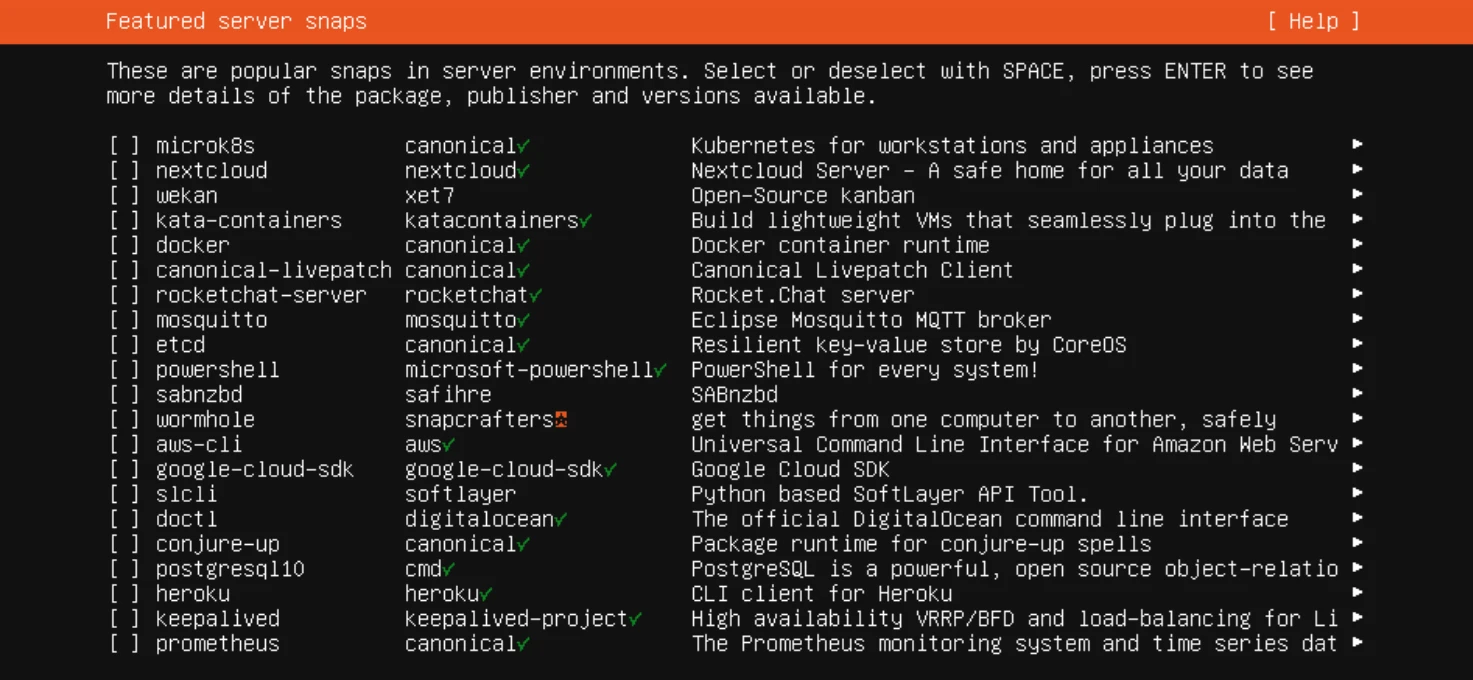
- Do NOT Select ‘Nextcloud’ from the ‘Featured Server Snaps’ Screen
- We’ll be installing Nextcloud manually.
Note: Once Ubuntu Server is installed, you should be able to connect over SSH.
2. Server Setup
Setting the Timezone
First, set your server’s timezone to ensure logs and scheduled tasks run at the correct times. Replace America/New_York with your local timezone:
sudo timedatectl set-timezone America/New_York
Updating the System
Update your package lists and upgrade existing packages:
sudo apt update -y
sudo apt upgrade -y
Install required packages:
sudo apt-get install net-tools vim
Setting Up the Firewall
Usually I’d recommend using UFW (Uncomplicated Firewall), but Docker bypasses UFW rules because it manipulates iptables directly. Since we chose a minimal Ubuntu Server installation, UFW isn’t installed. Instead we’ll use firewalld. Docker integrates with firewalld, as stated on their website, Docker automatically creates a firewalld zone called docker, with target ACCEPT.
- Install firewalld
sudo apt install firewalld - Enable and Start
firewalldsudo systemctl enable firewalld sudo systemctl start firewalld
Note: We don’t need to open HTTP or HTTPS (SSH is enabled by default) since Docker handles this as previously mentioned.
Installing Docker
Since we’ll be using Docker to run Nextcloud, we’ll install Docker and Docker Compose:
sudo apt install -y apt-transport-https ca-certificates curl gnupg lsb-release
Add Docker’s official GPG key:
curl -fsSL https://download.docker.com/linux/ubuntu/gpg | sudo gpg --dearmor -o /usr/share/keyrings/docker-archive-keyring.gpg
Set up the stable Docker repository:
echo \
  "deb [arch=$(dpkg --print-architecture) signed-by=/usr/share/keyrings/docker-archive-keyring.gpg] \
  https://download.docker.com/linux/ubuntu \
  $(lsb_release -cs) stable" | sudo tee /etc/apt/sources.list.d/docker.list > /dev/null
Update package lists again:
sudo apt update
Install Docker Engine and Docker Compose:
sudo apt install -y docker-ce docker-ce-cli containerd.io docker-compose-plugin
Configuring the Hosts File
Add your server’s IP address and hostname to the /etc/hosts file:
sudo vi /etc/hosts
Note: You’ll want to ensure your internal DNS resolves to these hostnames. See the section below on split DNS to handle external / internal name resolution.
Add the following line, replacing with your server’s IP and desired hostname:
192.168.1.146 your_domain_name
Note: Use your own IP address and hostname here.
Enabling Automatic Updates
Set up unattended upgrades to keep your system up to date:
- Install unattended-upgrades
sudo apt install -y unattended-upgrades - Enable automatic updates
sudo dpkg-reconfigure -plow unattended-upgrades - Configure
/etc/apt/apt.conf.d/50unattended-upgradesThis file controls which packages get updated. It should already be pre-configured, but you can review it or modify it if necessary. Just remove the//to uncomment the lines you want.sudo vi /etc/apt/apt.conf.d/50unattended-upgradesExample:
Unattended-Upgrade::Allowed-Origins { "${distro_id}:${distro_codename}"; "${distro_id}:${distro_codename}-security"; // Extended Security Maintenance; doesn't necessarily exist for // every release and this system may not have it installed, but if // available, the policy for updates is such that unattended-upgrades // should also install from here by default. "${distro_id}ESMApps:${distro_codename}-apps-security"; "${distro_id}ESM:${distro_codename}-infra-security"; "${distro_id}:${distro_codename}-updates"; // "${distro_id}:${distro_codename}-proposed"; // "${distro_id}:${distro_codename}-backports"; }; - Check the status of
unattended-upgradessudo systemctl status unattended-upgrades - Test with
--dry-runsudo unattended-upgrades --dry-run --debug
Adding a Data Disk with LUKS Encryption
At this stage of the setup, we’ve got Ubuntu installed, but I’ll assume the system (OS) disk won’t have enough capacity for our file sync data. I’ll refer to this as the Nextcloud data disk. In my setup, my Nextcloud virtual machine has a 100GB system disk and an additional 4TB disk for Nextcloud data.
As I mentioned earlier, LUKS disk encryption only applies to block devices (HDD, SSD, iSCSI, virtual disks, etc.). My preference is to use a virtual disk, whether you are using Proxmox or VMware, as it simplifies the setup without the need for iSCSI or other complications. If you’re using a physical server, desktop PC, or laptop with physical disks installed, that’s perfectly fine too.
Note: In my example below, my 4TB data disk is presented as /dev/sdb to Ubuntu.
Encrypting the Disk
Note: In the following steps, replace /dev/sdb with the actual device name of your data disk.
- Check the device name for your data disk
sudo fdisk -l - Prepare the data disk for LUKS
sudo cryptsetup luksFormat /dev/sdbThis initializes LUKS encryption on the device
/dev/sdb. During this process, you are prompted to enter a passphrase (keep this secure, such as inside your password manager). This passphrase is stored in key slot 0, which is the first slot of the LUKS header. This is important because without at least one valid key, the encrypted volume cannot be unlocked. For automatic unlocking during system boot, we’ll add an additional key to the LUKS header (key slot 1). - Open the encrypted volume:
sudo cryptsetup luksOpen /dev/sdb datacrypt - Format the encrypted partition:
sudo mkfs.ext4 /dev/mapper/datacrypt
Note: I named the encrypted volume datacrypt but you can choose your own volume name here.
Creating a Key File for Automatic Unlocking
- Create a key file and add it as an additional key to your LUKS partition:
sudo dd if=/dev/urandom of=/root/luks.key bs=1024 count=4 - Set permissions:
sudo chmod 600 /root/luks.key - Add key to LUKS (remember to change
/dev/sdbto the correct device path):sudo cryptsetup luksAddKey /dev/sdb /root/luks.key
Configure /etc/crypttab
- Edit the
/etc/crypttabfile to set up automatic decryption at boot:sudo vi /etc/crypttab - Add the following line (remember to change
/dev/sdbto the correct device path):datacrypt /dev/sdb /root/luks.key luks
Mounting the Encrypted Disk
- Create a mount point and add an entry to /etc/fstab:
sudo mkdir /data - Edit
/etc/fstab:sudo vi /etc/fstab - Add the following line:
/dev/mapper/datacrypt /data ext4 defaults 0 2
Rebooting and Verifying
- Reboot the system and verify that the disk is mounted:
sudo reboot - After reboot, you should see the /data mount for the new disk:
df -h
Setting Permissions
- Ensure that the web server user (www-data) owns the data directory:
sudo chown www-data:www-data /data -R
3. Installing Nextcloud (Docker)
Creating a Docker Compose File
- Create a directory for Nextcloud and navigate to it:
sudo mkdir -p /data/nextcloud - Change to the Nextcloud directory:
cd /data/nextcloud - Create a
docker-compose.ymlfile:sudo vi docker-compose.yml - Add the following content to
docker-compose.yml:
services:
  nextcloud:
    build: .
    container_name: nextcloud
    restart: always
    ports:
      - "443:443"
    volumes:
      - /data/nextcloud/html:/var/www/html
      - /etc/letsencrypt/live/your_domain_name/fullchain.pem:/etc/ssl/certs/ssl-cert.crt:ro
      - /etc/letsencrypt/live/your_domain_name/privkey.pem:/etc/ssl/private/ssl-cert.key:ro
    environment:
      - NEXTCLOUD_DATA_DIR=/var/www/html/data
      - NEXTCLOUD_TRUSTED_DOMAINS=your_domain_name your_ip_address
    depends_on:
      - db
      - redis

  db:
    image: mariadb:10.11
    container_name: nextcloud_db
    restart: always
    environment:
      - MYSQL_ROOT_PASSWORD=your_db_root_password
      - MYSQL_PASSWORD=your_db_password
      - MYSQL_DATABASE=nextcloud
      - MYSQL_USER=nextcloud
    volumes:
      - /data/nextcloud/db:/var/lib/mysql

  redis:
    image: redis:alpine
    container_name: nextcloud_redis
    restart: always
    volumes:
      - /data/nextcloud/redis:/data
    command: ["redis-server", "--unixsocket", "/tmp/redis.sock", "--unixsocketperm", "770"]
Replace the following:
| Configuration | Value |
|---|---|
your_domain_name |
Replace with your own domain name (e.g., nextcloud.domain.com) |
your_ip_address |
Replace with the local IP address of your server |
your_db_root_password |
Replace with a strong root password for MariaDB |
your_db_password |
Replace with a strong password for the Nextcloud database user |
Note: We’re using the recommended version of MariaDB 10.11 according to the system requirements
Configure Nextcloud to Use Apache
- Create
Dockerfile:sudo vi /data/nextcloud/Dockerfile - Add the following:
FROM nextcloud RUN a2enmod ssl COPY nextcloud.conf /etc/apache2/sites-available/nextcloud.conf RUN a2ensite nextcloud.conf - Create `nextcloud.conf’:
sudo vi /data/nextcloud/nextcloud.conf - Add the following:
<VirtualHost *:443>
    ServerName your_domain_name

    DocumentRoot /var/www/html

    SSLEngine on
    SSLCertificateFile /etc/ssl/certs/ssl-cert.crt
    SSLCertificateKeyFile /etc/ssl/private/ssl-cert.key

    <Directory /var/www/html/>
        AllowOverride All
        Require all granted
        Options FollowSymLinks MultiViews

        <IfModule mod_dav.c>
            Dav off
        </IfModule>
    </Directory>

    ErrorLog ${APACHE_LOG_DIR}/nextcloud-error.log
    CustomLog ${APACHE_LOG_DIR}/nextcloud-access.log combined

    <IfModule mod_headers.c>
        Header always set Strict-Transport-Security "max-age=15768000; includeSubDomains; preload"
    </IfModule>
</VirtualHost>
Note: Replace your_domain_name with your actual domain name.
4. Setting Up Let's Encrypt SSL Certificate
We won’t be exposing our Nextcloud server to the internet, however, we do need to use an external domain name if we want to use LetsEncrypt, and take advantage of a trusted SSL certificate. The last thing we want is to deal with self-signed certificate warnings on each of our devices accessing Nextcloud!
Domain Names
I recommend using with Namecheap or Njalla to register a custom domain. Remember, you won’t be using this to access Nextcloud over the internet, but it will be used internally (e.g. nextcloud.yourdomain.com) and to obtain valid SSL certificates for HTTPS from LetsEncrypt.
I also recommend using Cloudflare to manage the DNS (Domain Name System) for your custom domain. In the next section, I guide you through obtaining a Cloudflare API key which we’ll need in order to obtain our SSL certificates without making the server accessible from the internet.
If our server were accessible from the internet, we would have just used certbot to simply create and renew our SSL certificates. As we are doing things a little differently for added security, we’ll use the DNS-01 challenge method which involves proving control over a domain by adding specific DNS TXT records. I use CloudFlare to host the DNS for my domain names, which I’ll use in my example below.
Internal DNS
Let’s say my Nextcloud instance is on nextcloud.psysecure.com. Since I won’t be opening up my firewall to allow this over the internet, I don’t need to add a DNS record in Cloudflare. However, I do want my internal devices to resolve that to an internal IP address. For my home network I use two PiHole servers (virtual machines) but these could also be installed on a Raspberry Pi. They have a ‘Local DNS’ setting, that allows you to add internal DNS records, so nextcloud.psysecure.com would point to the internal IP address of your Nextcloud server (E.g. 192.168.100.146).
Installing Certbot and DNS plugin:
sudo apt update
sudo apt install -y certbot python3-certbot-dns-cloudflare
Obtain CloudFlare API Key
- Log into CloudFlare and go to https://dash.cloudflare.com/profile/api-tokens
- Choose ‘Use Template’ next to ‘Edit zone DNS’
- In Zone Resources > Include > Specific Zone, choose your domain that you’ll use for Nextcloud.
- Click ‘Continue to Summary’
- Create Token
- Save this API token in your password manager, don’t lose it!
Configure DNS API Credentials
- Create a credentials file with your DNS API token or keys:
sudo mkdir /etc/letsencrypt/dns sudo vi /etc/letsencrypt/dns/cloudflare.ini - Add your API credentials to the file:
dns_cloudflare_api_token = your_cloudflare_api_token - Change permissions:
sudo chmod 600 /etc/letsencrypt/dns/cloudflare.ini
Note: Replace your_cloudflare_api_token with your CloudFlare API key
Request the Certificate
sudo certbot certonly \
  --dns-cloudflare \
  --dns-cloudflare-credentials /etc/letsencrypt/dns/cloudflare.ini \
  --dns-cloudflare-propagation-seconds 60 \
  -d your_domain_name
Note: Replace your_domain_name (E.g. nextcloud.domain.com)
Starting the Containers
sudo docker compose up -d
Verify the containers are running:
sudo docker ps
You should see two running containers, for example:
CONTAINER ID   IMAGE                 COMMAND                  CREATED         STATUS                  PORTS                                           NAMES
4678a7c04652   nextcloud-nextcloud   "/entrypoint.sh apac…"   5 seconds ago   Up 2 seconds            80/tcp, 0.0.0.0:443->443/tcp, :::443->443/tcp   nextcloud
e3158965d2d5   redis:alpine          "docker-entrypoint.s…"   5 seconds ago   Up Less than a second   6379/tcp                                        nextcloud_redis
7f94e9dce0ab   mariadb:10.11         "docker-entrypoint.s…"   5 seconds ago   Up 3 seconds            3306/tcp                                        nextcloud_db
5. Finalizing Nextcloud Setup
Open a web browser and navigate to http://your_server_ip to complete the Nextcloud setup. You will be prompted to create an admin account and configure the database connection. I recommend creating a random username (not admin), similar to my example below. Don’t lose this, store it in your password manager!
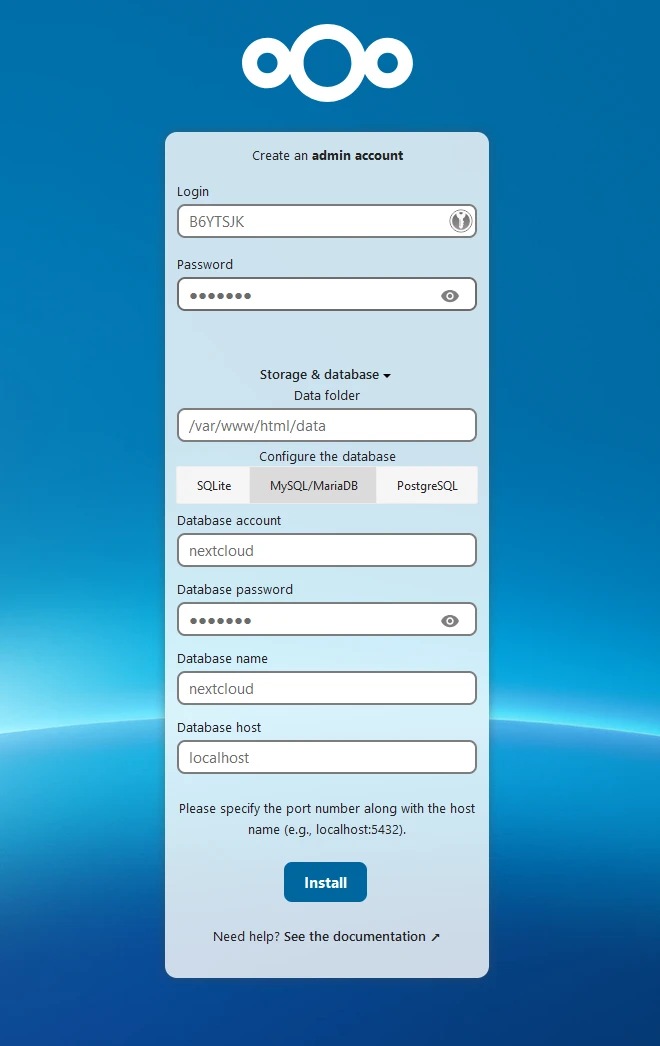
- Click ‘Storage & database’
- Select ‘MySQL/MariaDB’
| Configuration | Value |
|---|---|
| Database account | nextcloud |
| Database password | The your_db_password you set in docker-compose.yml |
| Database name | nextcloud |
| Database host | db |
Click Install!
Note: Access your Nextcloud instance via https://your_domain.com and verify that everything is working correctly.
Enable Redis for Memcache
- Edit
config.phpsudo vi /data/nextcloud/html/config/config.php - Add the memcache settings to the end of the config
# Existing config above
  'memcache.local' => '\\OC\\Memcache\\Redis',
  'memcache.locking' => '\\OC\\Memcache\\Redis',
  'redis' =>
  array (
 'host' => '/tmp/redis.sock',
 'port' => 0,
 'timeout' => 1.5,
  ),
);
Errors and Warnings
By this stage you should be logged into Nextcloud. If you click on the user icon (top right) and choose ‘Administration Settings’ you might see a list of errors and warnings. Don’t panic, we’ll fix these!
1. Error: Some files have not passed the integrity check. List of invalid files… Rescan… For more details see the documentation.
This error is related to this issue, since Docker leaves a .lock file behind. We just need to remove it, as follows:
- Access the Nextcloud Docker container:
sudo docker exec -it nextcloud bash - Navigate to the Nextcloud installation directory:
cd /var/www/html - Remove the extra file causing the issue:
rm nextcloud-init-sync.lock - Exit the container:
exit - Click ‘Rescan’ in the Nextcloud Administration Settings and this error will go away.
2. Warning: Server has no maintenance window start time configured.
To configure a maintenance window, just edit config.php and add 'maintenance_window_start' => 1, to the end.
sudo vi /data/nextcloud/html/config/config.php
Add this configuration line
'maintenance_window_start' => 1,
3. Warning: One or more mimetype migrations are available. Occasionally new mimetypes are added to better handle certain file types.
Run occ maintenance:repair --include-expensive as instructed by the warning, inside our Nextcloud container:
sudo docker exec -u www-data -it nextcloud php occ maintenance:repair --include-expensive
Note: You can run other occ commands in the same way, in case you have other warnings that require this command to fix.
4. Warning: Detected some missing optional indices. Occasionally new indices are added (by Nextcloud or installed applications) to improve database performance.
Run occ db:add-missing-indices as instructed by the warning, inside our Nextcloud container:
sudo docker exec -u www-data -it nextcloud php occ db:add-missing-indices
5. Warning: RuntimeException image not found: image:apps/whiteboard.svg webroot: serverroot:/var/www/html
Hopefully they’ll fix this one. At the time of writing this guide, I found this issue which discusses the warning. To fix, they recommend installing the Whiteboard app, then disabling it.
6. Warning: Phone Region Not Set
sudo vi /data/nextcloud/html/config/config.php
Add this to the end:
'default_phone_region' => 'US',
Useful Docker Commands
Verify Docker installation
sudo docker run --rm hello-world
List all containers
sudo docker ps -a
Note: -a shows all containers, otherwise it’ll just show running.
Remove container
sudo docker rm <container_id>
Bring Down All Docker Compose Services
sudo docker compose down
Bring Up and Rebuild All Docker Compose Services
sudo docker compose up --build -d
Check Logs for Specific Container
sudo docker logs nextcloud
sudo docker logs nextcloud_db
sudo docker logs nextcloud_redis
Execute a Command Inside a Running Container
sudo docker exec -it nextcloud bash
Restart a Specific Container
sudo docker restart nextcloud
List all images
sudo docker images
Restart Docker Service
sudo systemctl restart docker